Showing posts with label How-to. Show all posts

Wednesday, January 19, 2011

Potted heart flower!

These were extremely fun and cute to make! I was squealing with excitement through the whole thing. :)

What I used:

2 bunches small fake red flowers
dowel
green foam
styrofoam heart (I couldn't find one, so I cut a heart shape from a styrofoam disc. worked out great-you don't even see the underneath anyways.)
peat moss
1 small plant pot
ribbon
paint

Pluck all flower heads off stems, dab hot glue on end and stick into styrofoam heart. Continue til heart is covered. Paint dowel and pot (I used heirloom white). When dry, stuff green foam into pot, push dowel into bottom of heart and then into the green foam in pot. Top pot with a little peat moss, tie ribbon around dowel and you got yourself a cute potted heart flower!

Perfect addition to my mantel!

Saturday, November 20, 2010

Snowman Topiary

I came up with this idea all on my own! I'm pretty happy about it :) It could use some more embellishing, but this is good for now! Besides being a bit time consuming, it's eeeeasy and fun! I wanna get a fun topiary pot to put it in and stuff with fake snow to set it in.
Here's how I did it:

1. Need- glue gun, pencil, squares of fabric and styrofoam ball
2. Poke pencil in middle of fabric square, dab hot glue on end
3. Stick it in styrofoam ball
4. Repeat all over ball until it's as full as you like it
5. Cut 2 small dowels for each layer and stack on top of each other
6. Embellish with button eyes (I tried to find some grey ones that look like coal), carrot nose (I carved a piece of wood to a cone shape and painted orange, stuck a nail in end and poked through styrofoam), and stick arms (remember all those fall branches I got? I got some perfect arms from them and spray painted them black).

That's it! what do you think?

Friday, October 15, 2010

Spooky Alchemy potion bottles

I thought these looked like a fun project and would add the perfect spooky touch to my mantle.
I downloaded labels from THIS site, there's some cool ones HERE too.
I didn't have a color printer or tan/tea stained paper. So I had to do it my own way. I just printed them b&w, cut them out, crumpled them up really good, layed out and brushed some distress ink over various parts of it. I used:
Then I just used gloss modge podge and glued them to the jars. I had a HARD time finding corks, finally found them at Hobby Lobby...that place has everything, and I should've just gone there in the first place. Fill jars with water and food coloring...experiment and you can come up with some cool colors. Some of the smaller jars in front I got at Walmart, bigger ones at Hobby Lobby and the rest I had saved from old soy sauce and spaghetti sauce jars. Two I bought with labels already on them.
Shots at day time, then night time with the black lights....gives it more of an eerie look. Love it! I put in a black light that shines right over the mantle also.
Eyeballs in jar and Skull head make a great touch!
I wanted to make som spooky spell books to put next to them but I'm running out of time! Maybe next year.

Tuesday, October 12, 2010

Cutting fabric with Cricut

First step: put your fabric onto heat n' bond or something similar. Follow directions to iron it on. (paper side should be face down)
Step 2: Place ironed-on fabric onto Cricut mat (paper side against mat and fabric right side up facing you).
Step 3: Set your Speed to maximum and Pressure to maximum. Cut.
Peel off and voila!

Now go iron it on a shirt or bag or whatever to dress it up!
I stitched around the edges of hat, band and buckle to make more durable, and added a cute button spider.
Inspired by THIS picture.
Goes great with the pumpkin flower I made her!
Oh yea, she's ready for Halloween with style. :)
If you want to use my hat, you are more than welcome to download it HERE and make one of your own shirts...or whatever! :) Included is SVG files of the hat, band, buckle and the SCUT file for Sure Cuts A Lot. You don't have to have a cricut to use the pattern; print it out and use it as a stencil! Have fun! :)

Svg video tute

I've had a few people asking for a tutorial on cutting fabric with your Cricut.
I'm going to start off showing you how I cut one of my own images by turning it into an SVG. You need Sure Cuts A Lot to use images from your computer. But if you just want to cut out something from one of your cricut cartridges onto fabric, I'll be doing that in the next post. :)
For some reason it takes 10 seconds for video to start.
This is my first video tutorial ever, so don't laugh too hard :) Hopefully you find it a little helpful.

Saturday, September 11, 2010

Zipper Flower

I'm lovin the new zipper style lately, totally fun and creative! I went to buy a headband but when I saw the price and how easy it looked to make, I was just achin to try it myself! So instead I bought some zippers, came home and had this done in less than 10 min. That's my kinda craft! :)

Even though I just saw one of them and pretty much knew how to do it, I still wanted to look up a tute to see how others did it. I liked THIS one. Mine doesn't look as pro as hers but it works well enough for me!
It was harder than I thought to find the metal headbands. I found mine at Hobby Lobby but it had teeth on it, so I just ripped them off and then I liked it. :) If anyone knows of somewhere else to get them, let me know!!

Now to try some different styles and make one in every color, right?! :)

Sunday, March 14, 2010

Faith's Party: Decorations

I can't tell ya how much fun I had making decorations for this party! I got so caught up in that I didn't really make time for Easter stuff. Easter.... *sigh* I'm a little too pooped to think about that right now.


There were a TON of decorations and I'm going to include links to where I was inspired and for the tutorials if any of you would like to ever use these ideas. All I can say is Google is my bestest friend, how else would I come up with these ideas?! ;) My main source of inspiration came from Here, Here, Here, and Here.

Faith's sign we put up outside. The letters I printed in color using THIS font and then cut them out and glued onto poster paper. You can get a huge roll of this at Walmart for $7! For the peppermints, I cut them out with my Cricut machine and taped lollipop/sucker sticks with them. The "poles" are empty wrapping paper tubes wrapped with colored cellophane. The tops of them, which you can't really see, are glass candle holders filled with gumballs, wrapped in opalescent cellophane. I got the idea myself when I looked at the candyland game and saw the King had a gumball staff.
For the gumdrops, I cut from cardboard, spray painted them and while still wet, sprinkled white sugar over them to give them a realistic gumdrop look!
For the lollipops: some I used styrofoam circles, but those got pricey after getting a few, so my mom came up with the brilliant idea to staple two paper/styrofoam plates together and then wrap in cellophane. Brilliant I tell you! Shove some dowels in there for sticks and there ya go.
Paper plate birthday sign. Paper pinwheels lined along the bottom of the wall.
My favorite part, Balloon arch! Don't be intimated by making these, because they are actually super simple. My dad let me borrow his air compressor to fill up balloons (or else I'd be dead from lack of oxygen), twisted balloons around some thin, flexible pvc pipe (found at Home Depot) and it was a cinch. The tricky part was getting it to stay up. I got some stakes that fit right into the pipes and tied the top of arch with string to my rain gutter. I really loved making this, I can't wait to have reason to make another one!
This is my pathetic attempt at a sucker topiary. I didn't have enough dum dums to close up all the spaces, so I had to make do with what I had. I was disappointed to find out that all those suckers make the styrofoam balls heavy....making it not able to stay standing. arg.

Wednesday, March 3, 2010

New Blogger feature!

Blogger has added the "New Page" feature where you can have more pages/tabs at the top of your page like some websites. Like:
About
Contact
Links/Favorites
Photo Albums
Videos
Projects
Tutorials
Shop
Website
Disclaimer
Press
Giveaways
Polls
Advertise
Guest Book
FAQ's
Favorite Posts

Maybe I'm just slow at figuring it out, but for those of you who Don't know and DO care, here's how to do it. =)

Click on your POSTING Tab, then EDIT PAGES; click on the blue button that says NEW PAGE.
You'll then see a page like this, similar to a regular post. You'll see though that at the bottom, the orange button says PUBLISH PAGE. So type in what you want your page to be and the info like I did below.
click PUBLISH PAGE and you'll see a page like this. I put it on Blog tabs, but you can do what you prefer. Save and Publish.
This is my home page, it now says Home and Contact Me!

If you go to your LAYOUT tab, you'll see under your Header a new bar that says PAGES. You can edit and arrange the order of the pages there.

I realized that i didn't have my email anywhere on my blog for people to contact me if they don't want it to show publicly as a comment. I'll be adding more tabs as soon as I figure out what. =) But until then...... Got questions for gOt cHiKiN? Contact Me! =)

Thursday, February 4, 2010

Ruffled Pillow!

We've had these pillows since we got married (4 years ago) and now.....well, they're just a tad hammered n hashed. Not so pretty anymore, not to mention they really don't match. I don't think we had anything that matched, we took anything we could get! ;)
A few days ago, I looked at my pillows with a sigh and then remembered a tutorial I saw HERE to make some CUTE ruffled pillows! I also had some extra fabric that I got on clearance from Hobby Lobby and it just happened to be the perfect color! WOA that hardly, like next-to-never happens.

So, this is the result:

I am totally in love with it! It definitely made quite a change to the look of the room. Wahoo!

Friday, November 27, 2009

Fabric flowers!

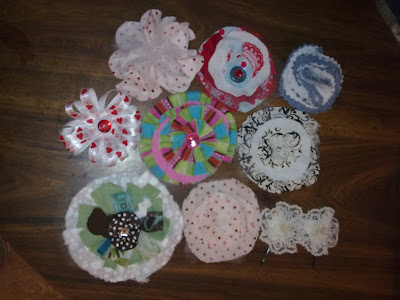
Alright, as promised... here are the fabric flowers I've been working on! And I'm sorry the pic is not that good...I SO need to get another charger for my camera!

They're all SO SO eeeeeeeeeeeeeasy cheeeeeeeesy! And there's no one way to do them and they don't have to be perfect...it actually looks better when they're not perfect circles. They're not pro by any means, but a lot better than paying $44 at the store!

Here's some tutorials that I used on some of my flowers.


I still have a bunch that I wanna whip up, I'm excited to try some other tutorials out, so stay tuned!!

Wednesday, July 15, 2009

Glitter Toes

Back in September when I was 7 1/2 months prego and couldn't reach my toes, I wanted to go beautify my toes and do the glitter toes for the first time. I loved them, they lasted forever.....and ever.....and EVER! I couldn't get those blasted things off! I'm still filing them off. I guess I could've paid to get them removed.

Anywayz, point is I've been searching for some ways to do it myself and found a really great way with NO acrylic!

Here's the How To:

1. Paint one coat of a coordinating color to the glitter you choose.
2. While paint is still wet, sprinkle glitter all over each toe to cover well. Make sure to do it over a piece of paper so that the excess glitter can be saved and reused. Also a small craft paint brush is helpful to brush away any excess.
3. Paint a clear top coat over the glitter to help keep it contained and add a shine to the sparkle.

Here's what I used:
I got the Glitter from Sally's (one of my fav. stores) and they have about 6 fun different colors!
I was excited to try it and asked Faith if she wanted hers painted also and she got so excited! It's so fun having girls! Yay for Pink and glitter!

She has such cute lil piggy toes!

They turned out great, just as sparkly as the acrylic ones except SO MUCH EASIER to get off!!
Even my hubby is happy....cuz it means less spending! ;)